TeleopXR
Transform your VR/AR headset into a powerful, precise robot controller. TeleopXR provides a lightweight, installation-free teleoperation interface with low-latency video streaming and full WebXR state tracking. Check the full documentation for the latest guides and API references.
Key Features
- 🕶️ VR/Passthrough: Seamlessly switch between fully immersive VR and high-fidelity AR Passthrough modes, allowing you to choose between total focus and situational awareness.
- 📡 WebRTC Video Streaming: Get ultra-low latency, real-time video feedback directly in the headset, providing a near-instantaneous visual link to your robot's perspective.
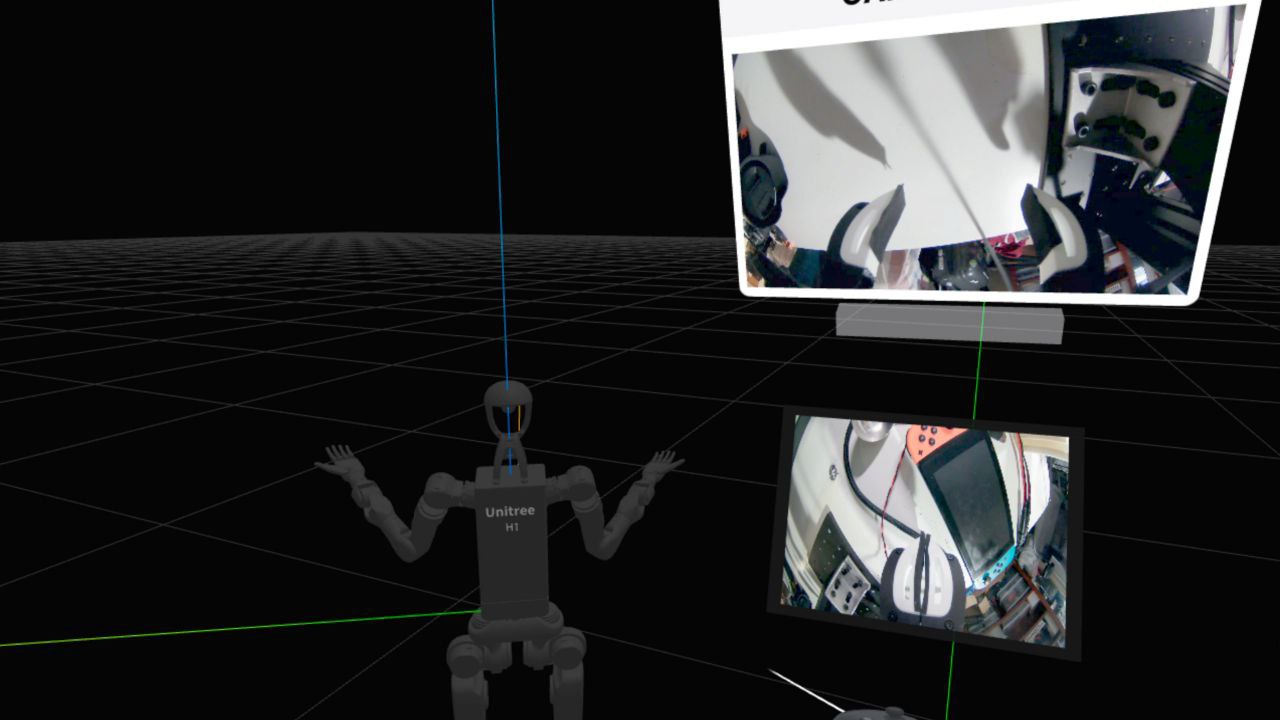
- 🤖 Robot Visualization: Benefit from real-time 3D visualization of the robot model, ensuring your digital twin is always perfectly synchronized with the physical robot's state.
- 🕹️ Realtime IK Control for Teleop and Scripts: Use the same Whole-Body IK stack for live XR teleoperation, relative end-effector deltas, and absolute scripted end-effector targets.
🚀 Quick Start (Demo)
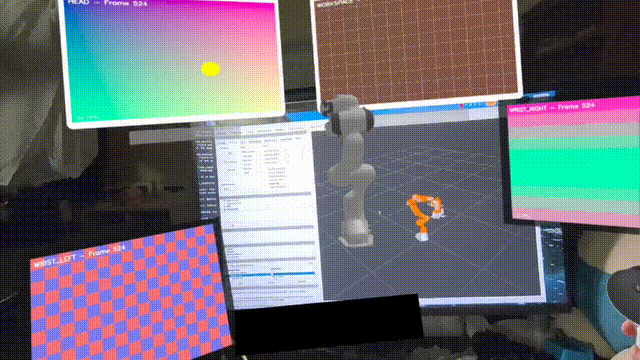
Use the built-in demo to verify connectivity and visualize the XR state data in real-time.
Installation
Basic installation (teleop mode only):
With IK support:
The IK solver requires additional dependencies. Install them with:
pip install teleop-xr
# Install IK dependencies from PyPI
pip install spatialmath-python>=1.1.15 gitpython>=3.1.46 xacro>=2.1.1 \
    filelock>=3.20.3 viser>=1.0.21
# Install pyroki and ballpark from GitHub (not available on PyPI)
pip install git+https://github.com/chungmin99/pyroki.git
pip install git+https://github.com/chungmin99/ballpark.git
Note:
pyrokiandballparkare not available on PyPI, sopip install teleop-xr[ik]will not work. Install them manually from GitHub as shown above.
Alternatively, if you have npm installed, install everything from source:
Running the Demo
Usage
- Open the displayed URL (
https://<ip>:4443) in your headset. - Enter VR mode.
- Observe the live state data and event logs in your terminal.
Modes
The demo supports two operation modes:
- Teleop Mode (Default): Visualizes raw XR state data and button events.
- IK Mode: Enables the high-performance IK solver (configured for Unitree H1 by default). Requires IK dependencies installed.
IK Control Modes
When you run the demo in IK mode, IKController supports three control paths:
teleop: default grip-driven XR teleoperation using relative motion snapshots.ee_delta: explicit end-effector delta commands for scripted relative motion.ee_absolute: explicit end-effector target poses for scripted absolute motion.
The built-in IK demo exposes the scripted paths directly in the TUI:
D: run the right-armee_deltademo.A: run the right-armee_absolutedemo.
While an explicit command mode is active, live XR teleop input is gated off so scripted motion and headset updates do not compete for control.
Supported Robots (IK)
TeleopXR currently includes the following built-in robot classes:
h1- Unitree H1 whole-body model for bimanual teleoperation.franka- Franka Emika Panda single-arm manipulator.so101- SO101 single-arm model with relaxed 5-DOF IK.openarm- OpenArm bimanual configuration fromopenarm_description.teaarm- Custom openarm extension with waist joints.
Use --list-robots to show all currently registered robots in your
environment.
📖 Documentation
For detailed guides on integrating TeleopXR into your own projects, including the Generic Python API, ROS2 Interface, and dora-rs Interface, visit the official documentation site.
Development
For developers contributing to TeleopXR or customizing the frontend:
Prerequisites
- Python 3.10+ with pip
- uv (recommended for development)
- Node.js & npm (for WebXR frontend)
Setup
- Clone the repository:
- Install Python dependencies:
Option A: Using uv (recommended)
Option B: Using pip
pip install -e .

# For IK support, install additional dependencies:
pip install spatialmath-python>=1.1.15 gitpython>=3.1.46 xacro>=2.1.1 \
    filelock>=3.20.3 viser>=1.0.21
pip install git+https://github.com/chungmin99/pyroki.git
pip install git+https://github.com/chungmin99/ballpark.git
- Build the WebXR frontend:
(The build output will be used by the Python server)
- Run from source:
# From the root directory
# With uv:
uv run python -m teleop_xr.demo

# Or with pip:
python -m teleop_xr.demo
Note on IK Dependencies
The IK solver requires pyroki and ballpark, which are not on PyPI. During
development with uv, these packages are automatically installed from git. For
pip-based installations, install them manually from GitHub as shown above.
Acknowledgments
This project is forked from SpesRobotics/teleop.
We also leverage powerful libraries for robotics:
- Pyroki: For high-performance, differentiable Inverse Kinematics and collision checking.
- Ballpark: For robust collision geometry generation and sphere decomposition.
License
This project is licensed under the Apache License 2.0. See the LICENSE file for details.